This document applies to K2B Audit versions prior to 6.0. Earlier versions are documented in K2B Audit.
In order to enable K2BAudit in your application, a series of steps must be followed. These steps will setup an audit database, determine which transactions should be audited, and generate the triggers that will record the information involved in each operation.
This page contains basic DBMS-agnostic instructions. Depending on the used DBMS specific configurations may be necessary.
Important: Before following the steps below, you must request K2BAudit licenses. To do so, follow these steps: Requesting K2BTools licenses.
K2BAudit Analyzer is provided as a standalone KB that must be generated for the desired environment.
Because of this, installation steps depend on which GeneXus version you are using.
If you are using GeneXus Evolution 2 follow these steps
If you are using GeneXus Evolution 3 or GeneXus 15 follow these steps
Return to the KB that contains your application. In that KB, execute the “Initialize Audit” action. When executing this action, a set of objects (called Basic Objects) will be imported into your KB.
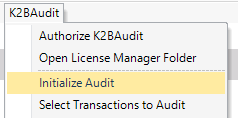 |
| Initialize audit action |
After the initialization is complete, a message may appear indicating that the developer must configure other parameters in their environment in order to use all the features offered by K2BAudit. Open the help page and follow the steps detailed there. After completing those steps, return to this page.
The pages corresponding to each DBMS are:
You can select which transactions should be audited in two ways: The first one allows the developer to choose if an individual transaction should be audited, and the second one allows the developer to see all audited transactions, and select/deselect them in bulk.
To select a transaction using this method, open the transaction and set its “Has Audit” property to “True”. This property was added when K2BAudit was installed.
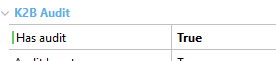 |
| Has Audit property |
To select which transactions should be audited, the developer may use the “Select Transactions to Audit” action. When this action is executed, a dialog will be shown where all transactions are displayed in two columns that contain the audited transactions and the non-audited transactions.
The developer can choose transactions in the “non-audited” column, and move them to the “audited” column.
After the selection is completed, execute the “Audit” action to confirm the selection.
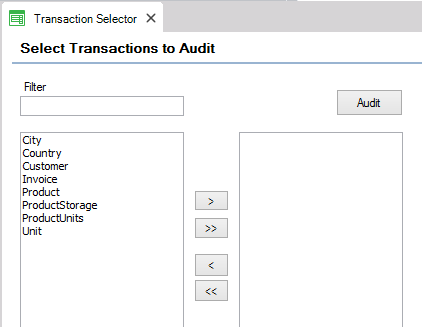 |
| Select Transactions to Audit dialog |
After selecting the transactions that should be audited, you must generate the audit triggers in the database.
To begin this process, execute the “Reorganize” action in the K2BAudit menu.
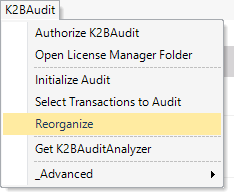 |
| Reorganize action |
When this process is executed, several procedures will be generated for the audited transactions, as shown in the image below.
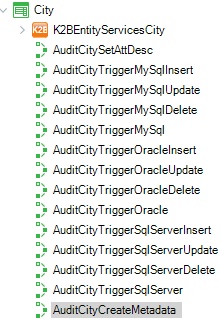 |
| Generated procedures |
These procedures define the triggers that will monitor the operations performed on the audited tables.
After generating these procedures, the Reorganize action will invoke the K2BAuditReorganize main program, that will execute all the generated procedures to create the triggers and update the Audit Metadata.
After these steps are complete, K2BAudit is ready to work in your environment. Take into account the following rules:
- If necessary, steps 3 and 4 can repeated as many times as necessary to adjust which transactions are audited, which attributes are audited, and the conditions associated with each transaction.
- The “Reorganize” action must be executed to update the triggers when a GeneXus reorganization is executed, especially if the audited tables were altered.
- These steps setup the development enviroment. If deploying a solution containing K2BAudit, see Deploying an application that contains K2BAudit.
- K2BAudit's trigger generation can be configured via de K2BAudit Settings (prior to 6.0) object. In that objects, the developer can configure how objects are named, for which platforms the audit triggers should be generated, and the behaviour of the "Reorganize" action.
- Trigger names can be customized for each specific table using K2BAudit properties in tables
|