When selecting a Menu in the Mobile Design System Configuration a SD Panel is created with the name chosen for the main program. In this case, the name of this panel is "SDTutorial".
In order for the menu to work, this panel must be the only panel as a Main program. For this reason, we have to turn off the property "Main program" of the other panels:
- Open panels "Panel1" and "CustomerList" and change "Main Program" property to false.
You can now run the panel "SDTutorial" to see how the menu works.
Once the menu is created, you can customize the items included in it. The menu is loaded inside a procedure named "K2BGetSDMenu". This procedure is called in the events of the panel, as shown in the image.
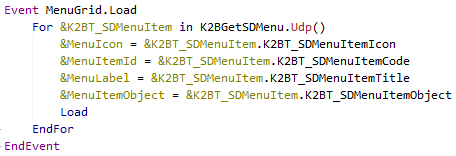 |
| Menu Load |
Each item included in the menu is added inside this procedure. By default, the menu comes with a lot of items inside of it. Now, we will delete all the items so we can have our customized menu:
- Delete all the code inside "K2BGetSDMenu" procedure except for the one shown in the image.
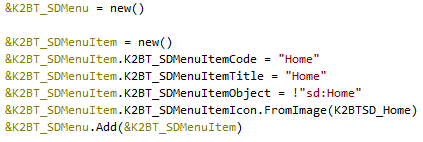 |
| K2BGetSDMenu |
- Custom Item:
- We will now add the SD Panel created in the last excercises to the menu. In order to do so, we have to edit the item we kept inside the "K2BGetSDMenu" procedure:
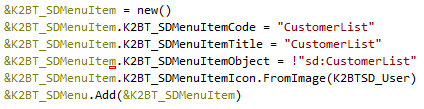 |
| CustomerList Item |
- Note: It is important you follow the format that is inside SDMenuItemObject property in order for the menu to work.
- Adding references to the panels:
- Everytime you add a new object to the menu, you must include a reference inside the Menu SD Panel. In order to do so, you have to add the following code to the start event of the panel:
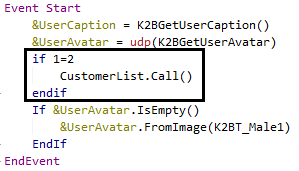 |
| Menu References |
You can now build you application and run the SDTutorial panel. You can see how the menu was updated with the item you added.
|