 |
| Wizard UI |
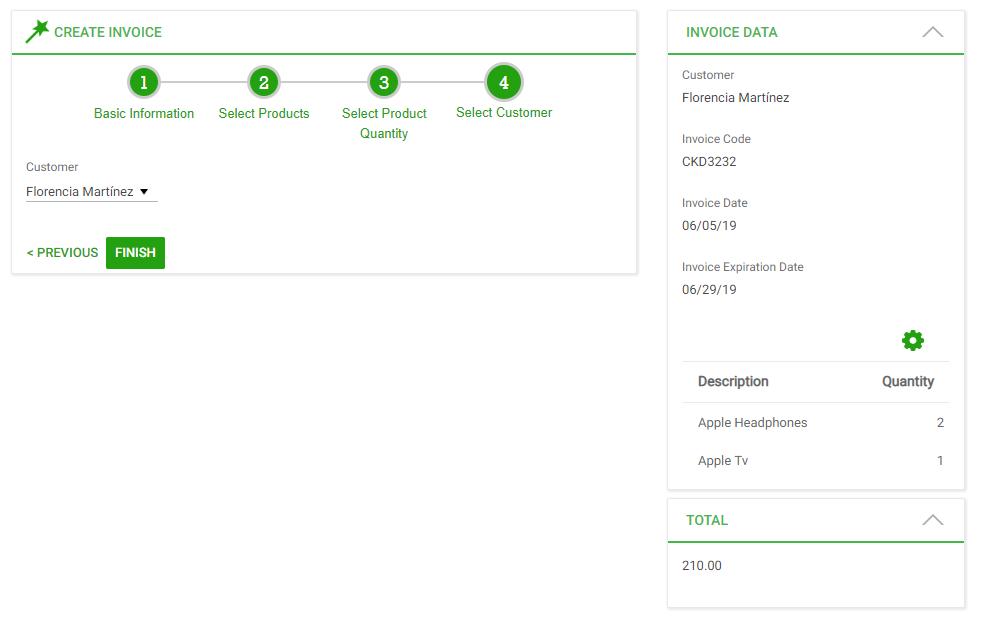
There are many scenarios in which the user needs to accomplish a very complex task. One strategy to simplify the task is to split it in a sequence of steps. For this purpose a wizard user interface is needed. K2BTools provides an easy, flexible and powerful way of creating Wizard User Interfaces.
Overview
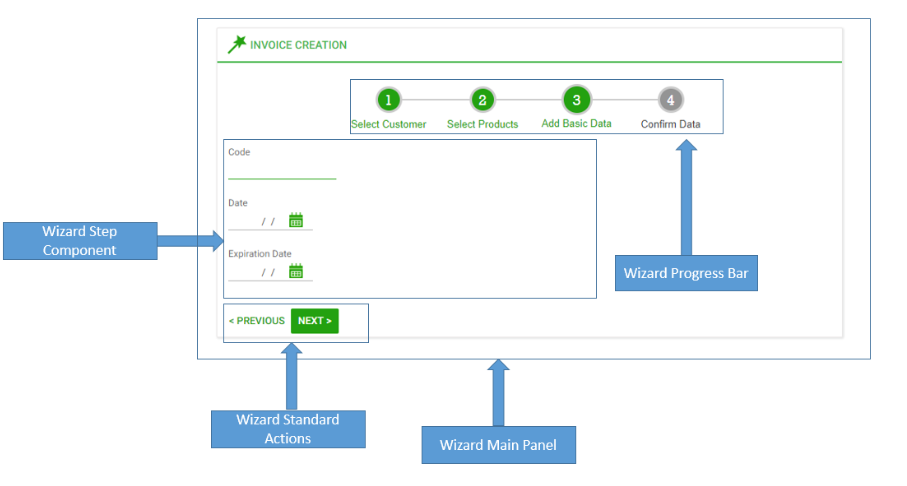 |
| Wizard Components |
A Wizard is composed of a series of steps, where each step implements a part of the Wizard.
Each step is implemented by a Web Component that is in charge of collecting and validating data related with that step. If the data is correct, the wizard goes to the next step.
Each web component can only belong to one Wizard.
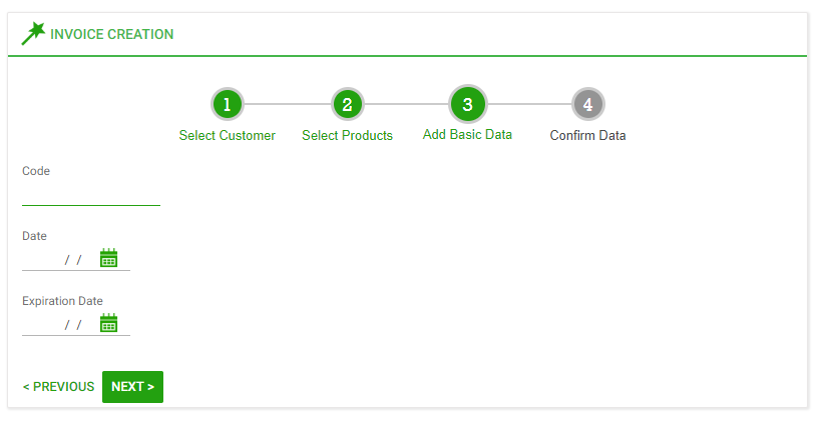
The wizard is defined in a Web Panel that is in charge of the wizard navigation, implementing the “Next” and “Previous” standard actions. It also implements the "Wizard Progress Bar", where the user can see the state of the wizard. This Web Panel is called the “Wizard Main Panel”.
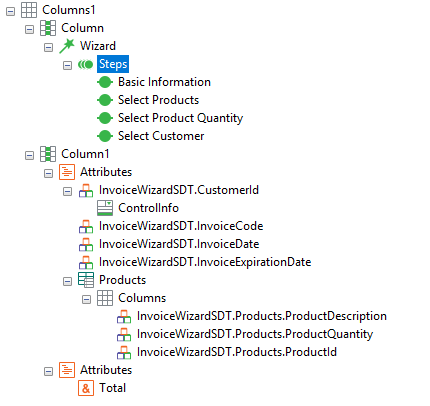
All steps in a wizard share contextual data. Different steps may read and/or write different sections of that data. The data is stored in an SDT, that will be defined by the developer. This SDT will be called “Wizard SDT”.
The “Wizard Main Panel” is in charge of handling that data and passing it to all steps when needed.
How to create a Wizard
1. Define the SDT that will be used for the Wizard
Each wizard, needs to have a “Wizard SDT”. A “Wizard SDT” is an SDT to temporary store data which will be shared among steps and will be used when the wizard is completed. For example, if the wizard persists data in the database, the information about the value of the records to be persisted should be stored in the Wizard SDT. For more information please read Defining a Wizard SDT.
2. Create a Web Panel with Web Panel Designer and add a Wizard node.
Wizards can be implemented using the WebPanelDesigner. So, to define a Wizard, create a Web Panel, activate the Designer part and add a Wizard node. In the Wizard Node set the SDT property to the SDT defined in the previous step.
 |
| Adding a Wizard node |
3. Add the steps neeeded for the Wizard
Now it is time to add the steps that implement the wizard. Each step is implemented by a Web Panel. There are two options in order to create a step:
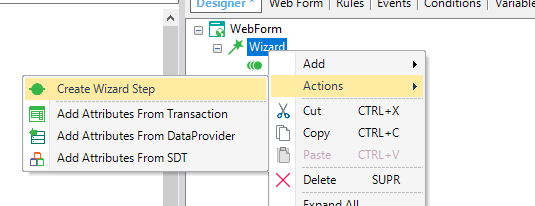
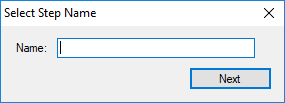
If the Web Panel associated with the step does not exists, the action Create Wizard Step can be used. In this action the name of the step and the SDT fields needed to be used in the Web Panel can be selected. For more information read Using Create Wizard Step Action
 |
 |
| Create Wizared Step Action |
Select Step Name |
 |
| Select SDT fields |
If the Web Panel exists, a Wizard Step node can be added, and then set the Web Component property to the Web Panel that implements the step. When the “Wizard Main Panel” is saved, the Web Panel set in the Web Component property will be set as a Web Component.
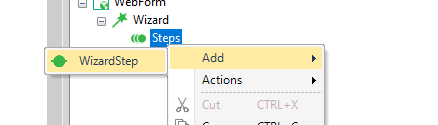 |
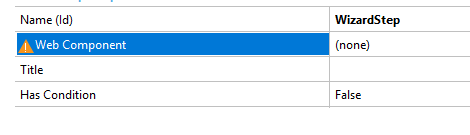 |
| Adding a Wizard Step Node |
Set Web Component |
4. Customize each step
When saving the objects, the logic implementing the wizard's flow will be generated. Also, each step will include logic to load and save data between the wizard SDT and the variables shown in the panel These are some customizations which can be performed in the Web Panel:
The initialization of the WPD variables with the “Wizard SDT”. Web Panel Designer will try to do a mapping between them, however, there are many cases in which the tool cannot infer the mapping, so mapping initialization code must be added to the U_OpenPage subroutine. For more information about automatic mapping read Automatic Mapping between Wizard SDT and WPD variables
When the Next or Finish (if it is the last step) action is executed, the event GlobalEvents.K2B_WizardConfirm is fired. This event will call the U_WizardConfirm subroutine. In this subroutine there are many things that can be customized.
Web Panel Designer will try to store the variables entered by the user in the “Wizard SDT”. However there are some cases in which this mapping cannot be inferred. For this purpose, code to store the variables in the Wizard SDT can be added. For more information read this.
Code should be added in order to decide whether the step was successfully completed or not. If the step is not successful the &WizardStepCompleted variable must be set to false. In this case the wizard will not continue to the next step.
Code could be added, to persist data in the database if needed. The purpose of this method is to give the developer flexibility to add the code needed when the step is completed.
5. Initialize the Wizard SDT in "Wizard Main Panel"
There are many scenarios in which the initialization of the Wizard SDT is needed before starting the wizard. For example if the Wizard persist data in the data base and allows resuming, or if the Wizard Data depends on some values that are selected before the wizard starts.
The developer can add code in the U_InitializeWizardSDT subroutine to achieve this. This subroutine is executed before the first step is created.
In order to perform this initialization, after setting the SDT values, the SDT JSON must be stored in WizardData_WizardMain variable.
 |
| Example of setting the CustomerId in a Wizard that starts with the CustomerId instanciated |
6. Finishing the Wizard
When the user presses the finish button, some actions should be triggered in order to complete the wizard. The developer can add code to decide what will happen when the wizard is finished, and perform global validations on the data entered by the user. Depending on the implementation of the wizard, this code can be added in two places:
In the U_WizardConfirm subroutine of the last step. The developer can use this subroutine in the last step to implement the finish action. It can be used to invalidate the step, or to add code to persist the result of the wizard in some data structure
In the U_BeforeComplete subroutine in the “Wizard Main Panel”. Before the wizard is completed, the subroutine U_BeforeComplete is fired. This subroutine can be used to invalidate the wizard by setting the variable &IsValid_WizardMain to false if certain conditions are not met and also it can be used to add code to persist the result of the wizard in some data structure.
As mentioned in this page, the wizard implementation is flexible. The developer can choose to store data in the database, call a web service, write data in a log, or whatever he wants when the wizard is finished.
7. After Complete
The developer can configure what will happen after the Wizard is completed. One way to do that is to add code to the U_AfterComplete subroutine. This subroutine is fired when the wizard is completed. In this method the developer can choose, for example, to navigate to another panel, or to return to the caller.
Another alternative is to add an “After Complete Panel” in the “Wizard” node. When a Web Panel is set, after the wizard is finished, this Web Panel will be shown. The developer can configure if the After Complete Panel should appear as an additional step in the Wizard Progress Bar. For more information read Using After Complete in Wizards.
8. Conditional Steps
There are certain scenarios in which a step should be skipped depending on a condition related to the data that already entered by the user. K2BTools supports adding conditional steps. To do that, the Has Condition property in the Step node must be set to true, in which case a subroutine named IsStepAvailable_{StepName} is created. In this subroutine the developer must add the code to decide whether the step is available or not. For more information read Using Conditional Steps in Wizards.
9. Showing wizard information in the "Wizard Main Panel"
The “Wizard” node can be anywhere in the structure. Because of this, this user interface can be created easily.
 |
| WebPanel with a WizardNode and other components showing a summary of the data entered in the Wizard |
 |
| Instance specification of the WebPanel containing the Wizard and a summary of the data entered |
More UX customization
The Wizard node has a property called “Wizard Basic Layout”, that references a basic layout object.
The Wizard UX can be customized by modifying its basic layout. For more information read Using Wizard Basic Layout Object.
|