In-Grid actions apply only to the row they are located in. In other scenarios, you may want the user to select several lines and apply an action to all of them.
In this example you will add an option to change the status of a set of customers, instead of changing the status of one customer at a time. You will have to implement a procedure in order to do that, based on the following instructions.
- Open the Customer transaction and go to the K2BEntityServices pattern definition.
- Find the “WorkWith” node, and the “Actions” node inside it.
- Add an action in the “Actions” node, and set the following properties:
- “Control Name (Id)” to “ChangeSelectedCustomersStatus”
- "GXObject": "ChangeCustomerStatus"
- “Position” to “Bottom”
- “Caption” to “Change Status”
- “Row Selection” to “Multiple”
- Save and apply the pattern.
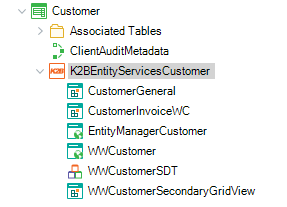
- Go to the Pattern object in the folder view, and see the objects generated. You should find an SDT called “WWCustomerSDT”. Open it and analyze its structure.
 |
| Generated Objects |
- Implement a procedure that receives a variable with type “WWCustomerSDT” as a parameter and changes the customer status for all items of the collection. You can do so by doing this:
- Create a new procedure called “ChangeSelectedCustomersStatus”.
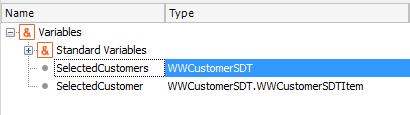
- Define a variable called “SelectedCustomers” with type “WWCustomerSDT”.
- Define a variable called “SelectedCustomer” with type “WWCustomerSDT.WWCustomerSDTItem”.
 |
| Variables |
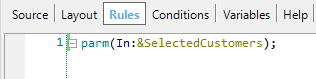
- Add a parm to receive the “&SelectedCustomers” variable value.
 |
| Rules |
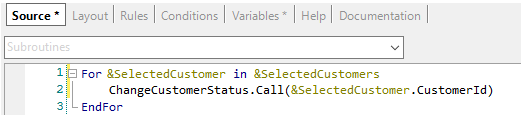
- Add code in the “Source” part to implement the action.
 |
| Source |
- Return to the action created in step 3, and set the “GXObject” property to “ChangeSelectedCustomersStatus”.
- Save, generate, and execute your app. Test the action in the Customer Work With (Located on the bottom of the grid). You must select an item to execute the action.
By default the selected rows of the grid are persisted when the user changes the page of the grid. To see this follow these steps:
- In the Web Panel select some customers and go to the next page in the grid.
- Select some customers on the second page.
- Return to the previous page an see how the customers remain selected.
- Try to search for a customer using the filters available in the screen.
- Clear the filters.
- See how the customers ramin selected.
By default actions with "Row Selection" = "Multiple" apply to all the rows that were selected by the user, regardless of the page that is currently being shown. You can change this behaviour by modifying the "Row Selection Scope" property located in the action. In the following part you will see how the "All Selected Rows" scope works.
- In runtime, select customers from two different pages, apply the action and see how the customer state is changed in both pages.
- Select some customers, search for a customer, and then apply the action (without clearing the filters) and see how the action is applyed to all selected customers.
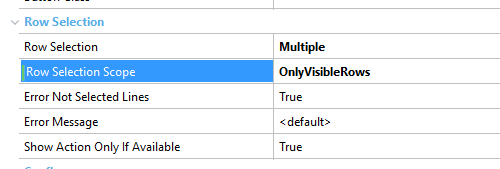
You will now see how "Row Selection Scope" = "OnlyVisibleRows" works.
- In the EntityServices instance associated with the "Customer" transaction, select the "ChangeSelectedCustomerStatus" action and set its "Row Selection Scope" property to "Only Visible Rows"
 |
| Row Selection Scope |
- Apply the pattern and generate the app.
Now see the change in the action's behaviour:
- Select some customers in the first page.
- Go to the second page, see how the action is not shown (because the action now applies to the current page and there are no selected rows)
- Select a customer.
- Apply the ChangeCustomerStatus action.
- See how the action is applied only to the current page.
- Return to the first page. See how the customers remains selected.
- Search for a customer that is not selected.
- See how the action is not shown.
- Select the customer.
- See that the action is applied only to that customer.
Note: You can disable row selection persistence by setting the "Persist Selected Rows" property in the "Work With" node to "False".
 |
| Persist Selected Rows |
Tip: As multiple actions can act on a lot of records, you probably won't want it to be executed by accident! Using K2BTools, you can specify that an action must be confirmed by the user before it is executed. To do that, the developer must set the “Confirm” property to “True”. Try it out!
|