In the last excersice, we selected a design system that was predefined. Now, we are going to customize that design system by changing a few properties inside of it.
- Open the design system configuration and go to "Master Page" tab.
- Select the "Horizontal menu".
- Disable "Application Logo".
- Change the application name to "K2B Tools".
- Disable the notifications component, footer and universal search.
 |
| Master Page |
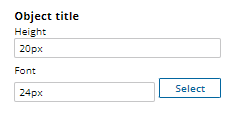
- Go to "Headers and footers" tab.
- Change "Object title" height to "20 px" and font to "24 px".
 |
| Object Title |
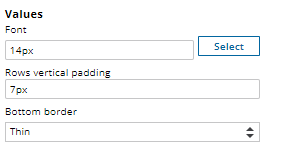
- Go to "Grids" tab.
- Modify "Font" property inside "Values" section to 14px.
- Change "Bottom border" property to "Thin".
 |
| Grids Values |
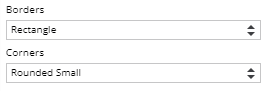
- Go to "Form Controls" tab.
- Change "Borders" property to "Rectangle".
- Modify "Corners" property to "Rounded small".
 |
| Form Controls |
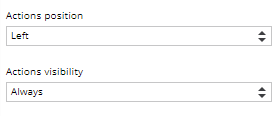
- Go to "Work With" tab.
- Modify "Actions positions" to "Left".
- Change "Actions Visibility" to "Always".
 |
| Work With |
- Click on finish, wait for the changes to apply and then Build the application (F5). See the results on runtime.
|