As we saw in runtime, every time the user performs an operation (insert, update or delete) an EntityManager interface is displayed and the operation is performed using the EntityManager. This interaction can be modified by the developer using the "Edit Mode" property.
"Edit Mode" is a property included in WorkWith and SubWorkWith nodes that allows the developer to choose a different behaviour when editing instances inside that interface. The values available for this property are "Standard" (default mode), "Master-Detail", "Popup" and "In Line".
In this mode, an EntityManager interface is created, and that interface is called to Insert, Display, Update, or Delete records. The Entity Manager is Mandatory: If the Entity Manager is not generated, the "Standard" mode cannot be generated.
Since this is the mode we were using in the last exercise, we are not going to apply it now.
In this mode, the WorkWith interface is equal to the Work With interface in the "Standard" mode. The main difference is that in this case, when executing the "Insert", "Display", "Update" and "Delete" actions the transaction is opened in a Popup screen instead of the EntityManager.
- Open the EntityServices instance for the Product transaction.
- Select its "WorkWith" node.
- Change the "Edit Mode" property to "PopUp".
 |
| Edit Mode Pop Up |
- Build and run.
- Insert, update and delete a product.
In this mode, the WorkWith screen is divided in two areas. The first one contains the controls found in the "Standard" Work With interface, while the second one contains a Web Component that will contain the transaction associated with the Work With. The Web Component is empty when the user enters the interface, and a "Select Record" message is shown. The Insert, Display, Update, and Delete actions trigger an update on the Web Component, to show the transaction in the correct mode.
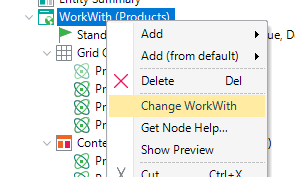
- Open the EntityServices instance associated with the Product transaction.
- Right click on the "WorkWith" node and select "Change WorkWith"option.
 |
| Change Work With |
- Select "Master Detail Grid" template and click on "Finish".
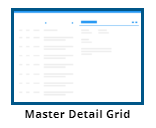 |
| Master Detail Grid |
.
- Build and run.
- In runtime:
- Select a product and see how the Web Component shows the selected product in display mode.
- Click on "More Information..." to go the EntityMangaer for that product.
- Add a new product
- After the insert is completed, component should display the product using the transaction's display mode. See how in this mode the update and delete actions are available
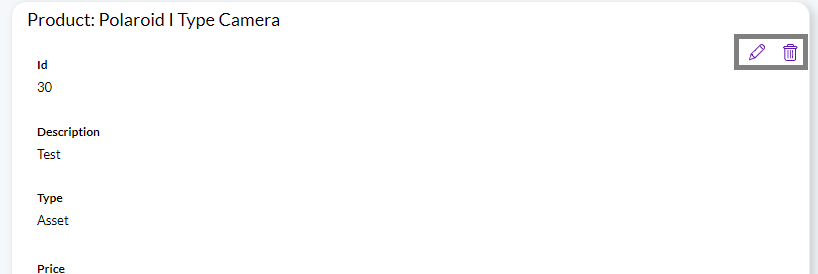 |
| Update and Delete in Master-Detail component |
- Update the recently added product.
- Delete that product.
In this mode, the WorkWith and SubWorkWith interfaces use their main grid to display, insert, and update information. When the insert action is executed a new line appears in the grid. When the update action is executed, non-readonly fields are shown as enabled so that the user can change their values and save them. When the delete action is executed, the item is deleted without navigating to the transaction.
- Open the EntityServices instance associated with the Product transaction.
- Right click on the "WorkWith" node and select "Change WorkWith"option.
|
| Change Work With |
- Select "Inline Edit Grid" template.
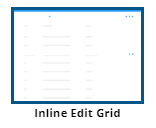 |
| Inline Edit Grid |
- Apply the pattern and click on finish.
- Run
- Insert, update and delete a product.
|