|
There are many scenarios in which developer needs to customize a region where the actions should be placed. A common example is in the image below, in which an expandable region of actions is needed.
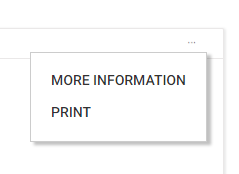 |
| Example of Custom Layout Action |
By default K2BTools provides fixed layout options for the actions depending on the object. For example in a “WorkWith” the options available in the action’s “layout” property are:
- Bottom
- Top
- Top (Right)
- Top (Left)
- GridAssociated (Left)
- GridAssociated (Right)
- InGrid
However these options may not be enough, and the developer may need another region to place the actions. In order to achieve the developer can edit the basic layout object and add a new option to the “layout” property.
In order to add a new region, developer must:
- Open the basic layout related to the object
- Add a textblock named CustomActions_{RegionName} in the webform.
- Save the basic layout.
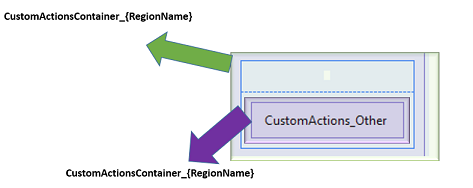
After doing that in the “Layout” property a new region named {RegionName} will appear. When applying the pattern, the textblock CustomActoins_{RegionName} will be replaced with the actions whose “layout” is {RegionName}.
 |
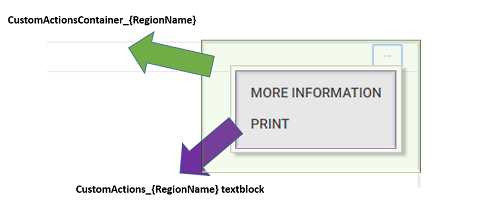 |
| Specification of custom action in basic layout |
Runtime appearance |
In some scenarios, to define an action region the developer must add extra controls to the web form.
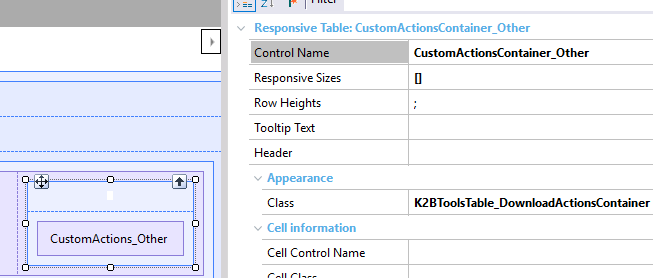
In the example above, the actions should be placed in a collapsible section. To implement the collapsible section and the button that will open and close it, the developer needs to add new controls. However, when no actions are included in that region, all those controls must be deleted. In order to do that, the developer must include these controls in a table called "CustomActionsContainer_{RegionName}". For the same reason, if code must be added to the layout to implement the region, it should be placed in a conditional slot starting with "//+ If.CustomActionRegion_{RegionName}". That way, the code will only be included when an action for that layout is present.
Suppose we want to implement the behaviour in the image above in a new layout region called “Other.”
For that purpose in the web form part:
- A “CustomActionsContainer_Other” table must be added. It will only be generated when there is an action whose “layout” is “Other”.
- An image showing “...” must be placed inside the table.
- The image “OnClickEvent” must be set to 'ToggleOtherActions'.
- A table that will be hidden or shown when the ToggleOtherActions events is fired must be included. This table name doesn't have to follow a naming convention. For this example we chose the name “OtherActionsTable”.
- Inside the table a textblock with control name “CustomActions_Other” must be added, that will be replaced with all the actions with layout:Other.
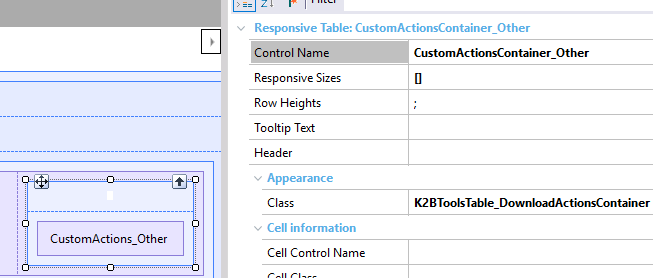 |
| Adding Other region to basic layout |
Then in the Events part the following code should be added
|
//(In start code, the table containing the actions should be hidden).
Event Start
//+ If.CustomActionRegion_Other
OtherActionsTable.Visible = false
//-
EndEvent
//When the image event is fired, the actions are shown or hidden depending on the visibility of the “OtherActonsTable”.
//+ If.CustomActionRegion_Other
Event 'ToggleOtherActions'
if OtherActionsTable.Visible = false
OtherActionsTable.Visible = true
else
OtherActionsTable.Visible = false
endif
Endevent
//-
|
|
Basic layout "Other layout action" region code
- In the start event hide the table containing the actions
- In the "ToggleOtherActions" hide or show the actions table.
- The code is inside CustomActionRegion_Other slot. It will only be generated if there is an action with "layout" property set to "Other"
|
After that in the actions placed in a General node the “Other” option will appear.
 |
| "Other" option appearing in "action" "layout" property |
The actions will be placed inside a collapsible region.
|